Fascination About Painting Laminate Countertops with Chalkboard Paint
from web site
What Does Painting or refinishing plastic laminate countertops Do?
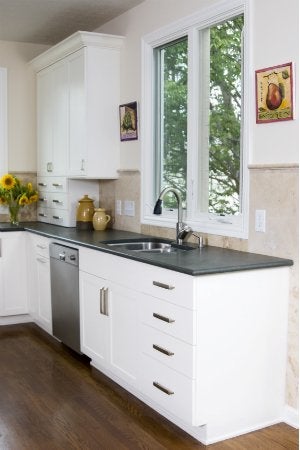
Still, numerous homes still sport Formica counters or cabinets in the other day's colors and patterns. Don't desire to do it yourself? Secure free, no-commitment price quotes from pro painters near you. While updating the color of Formica with fresh coats of paint can be a bit time-consuming, it isn't specifically hard, even for a novice to the diy scene.
This comprehensive guide on how to paint Formica will stroll you through changing your kitchen area or bathroom from ho-hum to wow. Tools & Products, How to Paint Formica, Whether you plan to paint Formica counters or cabinets, secure the surrounding areasfloors, particularly, however likewise lower cabinets if painting counter tops or counter tops if painting upper cabinetsand any close-by fixtures utilizing drop fabrics kept in place by painter's tape.

If painting a Formica counter top, tape off the sink, the backsplash, walls that edge the counter, and the lower cabinets. If painting cabinets, tape off surrounding walls (and, potentially, hinges if you aren't planning to loosen them). If you're painting Formica cabinets, remove manages or knobs from doors and drawer fronts.

Some Known Factual Statements About Painting or refinishing plastic laminate countertops
While it is possible to paint cabinet doors while in place, it can be simpler to eliminate them and lay them flat during the painting process. One pro suggestion: If you do remove the doors and drawers, ensure to mark each with their place on the back or inside so each will be easy to replace them in their right spot when you're finished.
Follow with a clean, water-soaked rag to get rid of any last traces of grease, and then wipe the laminate dry with a tidy towel or rag. Safeguard your eyes, skin, and lungs from air-borne laminate dust with safety glasses, gloves, and a dust mask. Then, utilize 120- or 150-grit sandpaper or a sanding block to scuff the glossy surface area.
Vacuum or use a tidy rag to remove all traces of sanding dust so that you can inspect for imperfections. Then, fix This Author , scratches, or cracks in the Formica surface area with epoxy putty, spreading the putty as smoothly as possible with a putty knife. Let the putty dry for the quantity of time suggested by the producer, and after that lightly sand it up until it mixes in with the remainder of the surface.
