How to Adjust Garage Door Spring and Cable Tension
from web site
How Do I Know If My Garage Door Spring Is Bad Or Broken
 How To Replace Your Own Garage Door Torsion Spring
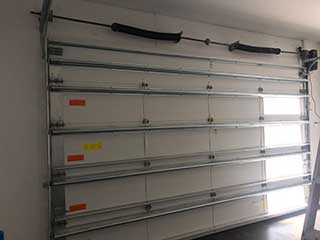
Twist the shaft to tighten up the cable on the drum. 42. While twisting, vise grip the shaft as revealed to keep the cable television tight on the drum. The top of the vise grip need to be tight versus the garage header. This will keep the cable on the first drum while you set up the cable on the other drum and place it in place.
43. If you wound the cable television properly, it will be taught as it comes off the cable drum. 44. Go to the other side of the garage door. Bend completion of the other cable television at a 90-degree angle. 45. Insert the cable television into the slot of the drum, and turn the drum up until the cable television is tight.
 How Do I Replace A Garage Door Spring?
Slide the drum versus the bearing and push the shaft to the left. The marks must line up. If they don't, identify why and correct the problem. One typical problem is that a person of the cable televisions gets stuck on the lock http://www.thefreedictionary.com/home repair striker, a track bracket bolt, or the end of a strengthening strut.
How Many Times Do You Turn A Garage Door Spring?
In addition, numerous garage doors have actually been set up with a gap between a drum and a bearing plate. The cable television drums ought to always be flush versus the race of the bearings. One common issue if this is not done is that a person of the springs will bind and the garage door won't close all the method.
Finger tighten the drum set screws till the drum will not turn. If you have a slotted center bracket, remove the vice grip and lube the shaft where it turns inside the bushing.
This bearing keeps the shaft from rubbing against the inside of the stationary cones. Some garage doors are installed without bearings. If you have no bearing in your spring anchor bracket, grease the shaft where it will be rubbing inside the cones.
How To Measure Garage Door Torsion Springs
Move the stationary cone to the spring anchor bracket and set up the bolts. Finger-tighten the nuts till the fixed cones are flush against the spring anchor bracket. Forcing the cones by tightening the bolts might break a cone if it is capturing on a bearing. Winding a spring with a cracked cone might trigger the spring to spin loose and the bar to fly.
If your spring currently has the cones set up, bring the entire spring to the spring anchor bracket. If your spring currently has cones set up, move to the winding cone and jump to step # 65.
Grip the spring and twist it onto the fixed cone. You can generally wind it about 2 turns by hand. 54. Using a pipeline wrench, grip the fourth, fifth and 6th coils away from completion of the spring and take down. 55. If one of the bolts remains in the way of the spring, eliminate the bolt and insert only completion of the bolt into the fixed cone from the opposite side.
How To Repair Garage Door Springs And Cables
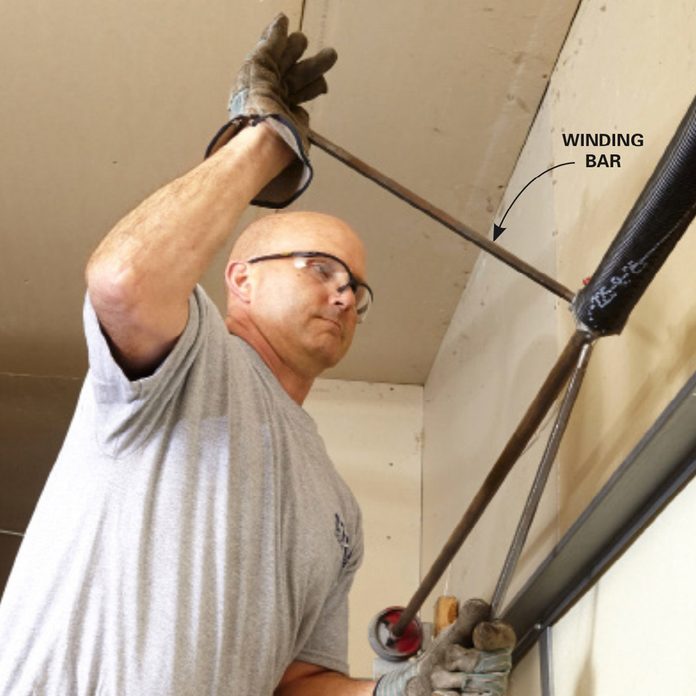
56. Continue till the spring is wound totally on the cone. If you got rid of a bolt to install the stationary cone, re-install the bolt. 57. Move to the winding cone. Screw the cone about 2 turns into the torsion spring by hand. 58. Place a winding bar into among the holes of the winding cone.
 The Spring: Torsion Vs. Extension
Continue to wind the cone onto the spring another 2 turns. Take down on the winding bar. Place the second winding bar into the plug, remove the first winding bar, and pull down on the 2nd winding bar. Continue until the cone no longer tightens. 60. Insert a winding bar into a hole on the top of the winding cone.
Repeat the previous 2 steps till the spring is completely wound on the cone. You are nearly ready to wind the spring.
7 Easy Steps To Adjust Garage Door Springs
Discount Door Service
1330 W Morning View Dr Tucson, AZ 85704
(520) 579-9084
www.DiscountDoorService.com
https://www.google.com/maps?cid=16286553429910297688
Do you want extra information on this matter? - My Explanation: http://mylespabx603.almoheet-travel.com/is-it-dangerous-to-replace-garage-door-springs
If your spring does not grow as you wind it, you are winding it the wrong instructions probably due to the fact that it is poorly set up. We often get calls about springs coming loose from the cones at about 6 turns. If this happens, you have the incorrect wind spring and need to install it on the other side of the door.
