Exactly how to Set Up a Water Conditioner
from web site
Just how to Mount a New Bathroom Seat and a Heating Duct
Rejuvenating the look of your restroom or improving the performance of your heating unit does not have to be a daunting task. Whether you're replacing a damaged toilet seat or adding a new home heating air duct, the process can be surprisingly simple with the right assistance. By familiarizing on your own with the actions and gathering the needed tools, you'll be well on your way to an effective setup. But be cautious one wrong step might bring about unanticipated obstacles that could derail your project. To avoid possible pitfalls and ensure a seamless procedure, it's important to approach this job with treatment and attention to information.
Trick Takeaways
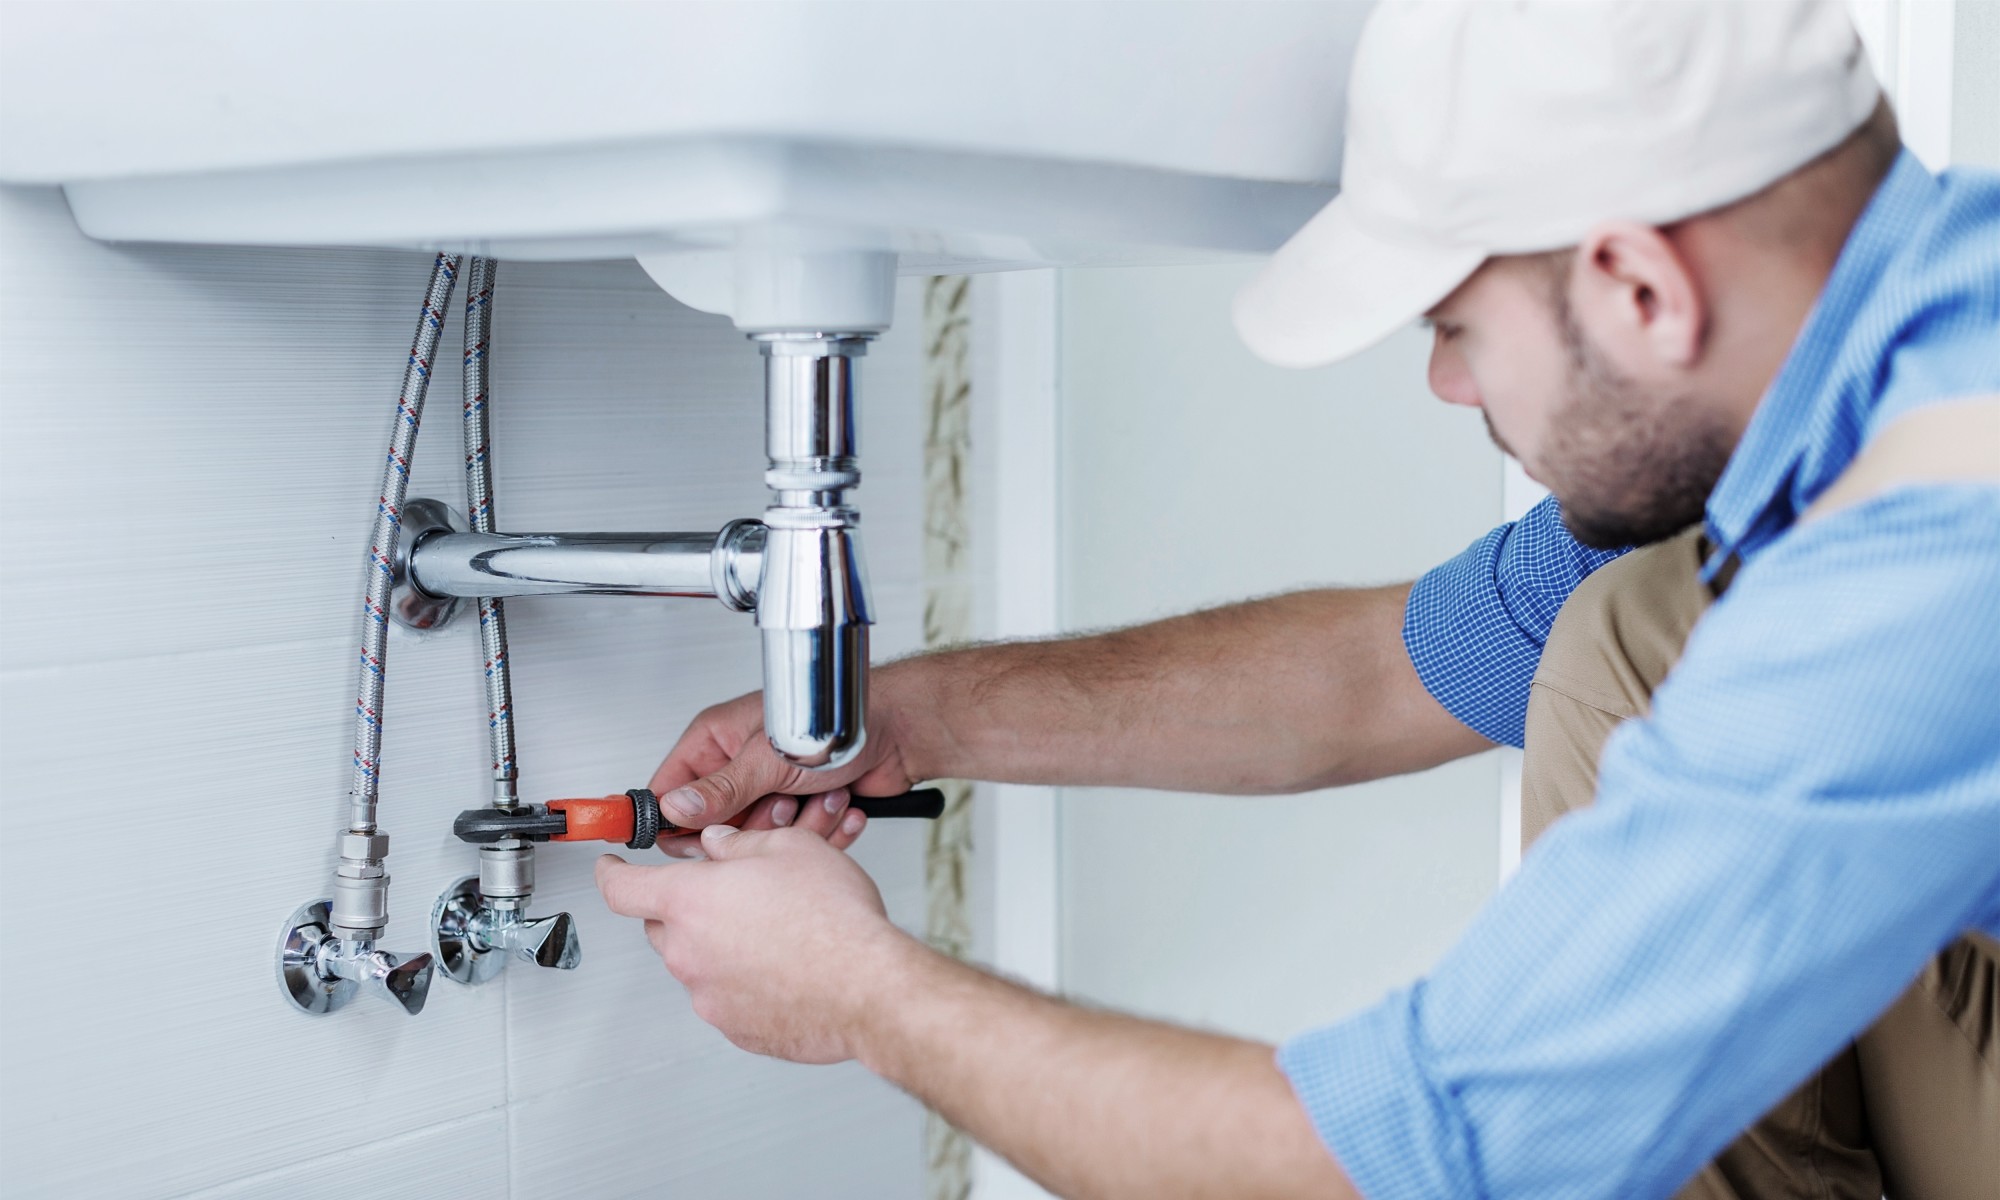
- Completely tidy the toilet dish and surface, and inspect the existing placing equipment before getting rid of the old seat.
- Carefully determine the toilet dish measurements to select the right size and kind of replacement seat.
- Align the brand-new seat appropriately and tighten the placing screws uniformly for a safe, level fit.
- Find the home heating duct opening, determine the air duct dimension, and reduced a precise hole for the new vent cover.
- Connect the air duct securely to the wall surface or ceiling framework, and ensure a limited, leak-free link to the heating unit.
Preparing the Commode for Installation
Prior to installing your brand-new bathroom seat, you'll need to correctly prepare the bathroom. Initially, completely clean the toilet bowl and seat to get rid of any kind of built-up crud or residue. This will certainly aid ensure an appropriate, protected fit for the brand-new seat.
Next, think about the seat material options. Plastic and timber are common selections, but you may also locate seats constructed from materials like molded wood compounds or perhaps slow-closing joints for added comfort. Whichever material you pick, ensure it works with your toilet design.
As part of your bathroom maintenance ideas, examine the existing mounting equipment. Verify the bolts are tight and the washing machines remain in good condition. Change any used or damaged components to produce a tough foundation for the brand-new seat. This interest to information will repay, leading to a protected, lasting setup.
With the bathroom prepped and all set, you can currently proceed to the real installment procedure. Remain tuned for the following actions!
Removing the Old Bathroom Seat
To remove the old toilet seat, you'll require to loosen the mounting bolts found under the seat.
When the screws are loosened up, you can simply lift the seat off the commode.
Make certain to clean up the surface of the toilet extensively before setting up the new seat.
Unscrew the Mounting Bolts
First, you'll require to unscrew the mounting bolts that protect the old bathroom seat in place.
Locate the bolts, commonly situated beneath the seat, and turn them counterclockwise to loosen and get rid of the seat from the toilet. Relying on the type of placing equipment, the bolts may be flat-head, hex-head, or perhaps wing-nuts.
As soon as the screws are loosened up, raise the old bathroom seat off the toilet. You may need to shake it a bit to obtain it complimentary. Take care not to damage the porcelain around the installing openings.
Take a look at the problem of the installing hardware - the screws, washing machines, and any type of other components. If they remain in good condition, you can recycle them when setting up the new bathroom seat.
Nevertheless, if they're put on or worn away, it's finest to replace the entire mounting equipment set for a safe and secure and trustworthy installation.
Lift the Seat
With the mounting bolts unscrewed, you can currently lift the old toilet seat off the toilet. Be gentle as you eliminate it, making sure not to harm the porcelain around the mounting openings. Appropriate training is essential throughout this action to ensure you do not break or chip the ceramic.
Thoroughly raise the seat, holding it from the sides as opposed to the front or back. This will assist disperse the weight evenly and prevent any sudden movements that could bring about a mishap. As soon as the seat is totally detached, evaluate the problem of the joints and installing hardware. This is a good time to do regular bathroom seat maintenance, such as cleaning up the location and looking for any wear or damages.
With the old seat got rid of, you're currently all set to set up the brand-new one. Make note of the alignment and positioning of the seat, as this will certainly make the installment procedure much smoother. Proceed cautiously and confirm your work to guarantee a protected and degree fit.
Clean the Surface area
Having removed the old toilet seat, you can now turn your interest to cleaning up the surface. Utilize a damp towel or light cleansing option to clean down the location, eliminating any type of particles or deposit left. This will assure a clean, smooth surface for the setup of the new seat. https://easthamplumber.co.uk
Take care to utilize the suitable cleaning products for the product of your bathroom. For a porcelain surface area, a gentle, non-abrasive cleaner will certainly do the trick. Stay clear of severe chemicals or rubbing pads that can scratch the surface area. Extensively clean away any type of continuing to be dust or grime, guaranteeing the area is totally dry prior to continuing.
Surface area prep work is vital for an effective commode seat installation. By taking the time to clean the area, you'll produce the ideal foundation for the new seat to securely attach. With a tidy, smooth surface area, you can be certain the installment will certainly go efficiently and the new seat will certainly fit properly.
Selecting the Correct Toilet Seat
When selecting a toilet seat, think about factors like the commode bowl's dimensions, the seat's material, and any type of specialized functions that might suit your needs.
Bathroom seat materials can differ, from the classic wood or plastic to even more long lasting alternatives like enameled wood or thermoplastic. Each product has its very own advantages - wood uses a conventional look, while plastic is easy to tidy. Comfort attributes like soft-close hinges or ergonomic designs can additionally make a distinction in your day-to-day shower room experience.
Measure your bathroom bowl to ensure you get the ideal dimension seat. Standard round and extended bowls have different measurements, so double-check before acquiring. Some seats even come with adjustable bumpers to fit a range of dish sizes.
In addition, think of any type of specialized features that could boost your convenience, like a warmed seat or integrated nightlight. With the right bathroom seat, you can create an extra pleasurable and individualized bathroom setup.
Installing the New Toilet Seat
As soon as you've chosen the optimal commode seat, you can carry on to the setup process. Initially, ensure you have the essential tools accessible, which may consist of a screwdriver, wrench, and possibly a putty knife or other tools depending upon your details seat version.
Begin by removing the old commode seat. This may include unscrewing the mounting equipment or simply lifting the seat off. Clean the commode surface area thoroughly to ensure a correct fit for the new seat.
Next, check out the new seat's materials and design style. Some seats are constructed from plastic, wood, or even elongated versions to accommodate various toilet forms.
Carefully line up the brand-new seat and protect it in position using the offered hardware. Tighten the installing screws uniformly to ensure a snug, level fit.
Evaluating the Heating Duct Location
With the commode seat set up, you'll currently need to analyze where the home heating duct lies. Check out the flooring around the commode to establish if any type of vents or openings exist, as these could show the visibility of a heating air duct. In addition, examine the wall behind the commode for any kind of noticeable ductwork or registers that may require to be represented during the installment procedure.
Next off, you'll intend to determine the duct dimension to guarantee the brand-new air vent cover will effectively fit. Use a tape measure to figure out the dimensions of the air duct opening. This info will be necessary when picking the proper air vent cover.
Collecting the Required Devices
Before installing the commode seat and home heating air duct, you'll wish to collect the needed devices. You'll need a screwdriver, a drill, a measuring tape, and any kind of other equipment defined by the manufacturer. Having these items accessible will improve the installment procedure and assistance assure an effective result.
The kind of screwdriver you'll need will depend upon the hardware made use of for your particular bathroom seat and heating air duct. A Phillips head screwdriver is an usual selection, but you might likewise call for a flathead screwdriver. See to it the screwdriver suggestions remain in great problem - worn or damaged tips can strip screw heads, creating frustration and potential damage.
The drill you make use of must be cordless for maximum movement and convenience. Choose a version with various little bit dimensions to fit any type of screw or screw demands. Consistently keep your drill by cleaning it and making certain the battery is billed before use.
Finally, the measuring tape is crucial for exactly marking and gauging the air duct positioning. Go with a sturdy, easy-to-read design that can hold up against the roughness of the installation procedure.
Cutting the Air Duct Opening
To begin the air duct installment, you'll need to cut an opening in the wall surface or ceiling where the air duct will be placed. Procedure the air duct's dimensions meticulously and mark the area to be cut, ensuring a specific fit. Make use of a drywall saw or utility blade to nicely slice through the wall surface or ceiling, making sure not to damage any existing electrical wiring or plumbing.
As soon as the opening prepares, you can start dealing with the duct products. Ascertain the duct size to make certain it matches the opening. Gently slide the air duct into the opening, ensuring it fits comfortably. Safeguard the duct in position making use of screws or duct tape, depending on the sort of air duct you're utilizing. Make sure the duct is degree and appropriately lined up prior to moving on to the next action.
Bear in mind to put on safety and security goggles and gloves when reducing and managing the duct products to shield on your own. Take your time and work meticulously to assure a professional-looking installation.
Safeguarding the Heating Duct
Since you've properly fit the air duct right into the opening, you'll require to secure it in position. Usage screws or duct tape to attach the duct to the wall surface or ceiling framework, ensuring it will not shift or come loose in time. Double-check that the duct is degree and straightened properly prior to proceeding to the next step in the installment procedure.
As soon as the air duct is safely ready, it's time to assess the significance of duct insulation. Proper insulation assists keep the wanted air flow efficiency by lessening warm loss or gain with the ductwork. Cover the duct with an appropriate insulation material, such as fiberglass or foam, and secure it in position with tape or adhesive. This action will not just improve energy efficiency however also aid stop condensation buildup, which can lead to mold and mildew and mildew concerns.
Focus to detail is essential when securing the home heating duct. Take your time, and ensure a limited, secure fit to guarantee peak air flow and long-term duct performance.
Connecting the Duct to the System
Alright, let's discuss linking that duct to your heating system.
Initially, you'll need to recognize the best area to connect it.
When you've discovered the spot, securely secure the connection to guarantee a limited seal and protect against any kind of air leaks.
Duct Attachment Location
Establishing the perfect duct add-on area is crucial for assuring efficient heat circulation throughout your area. Very carefully analyze the design of your system and available gain access to indicate recognize the most calculated position to connect the air duct. Think about key air duct layout considerations, such as lessening bends and transforms, which can impede air flow and minimize ventilation performance.
When choosing the attachment place, purpose to select a spot that provides straight and unobstructed access to the main ductwork. Avoid areas with limited areas or barriers that could prevent the installment process. Additionally, verify the picked area permits very easy access for future upkeep and cleansing.
As soon as you have actually recognized the most effective add-on point, prepare the surface by completely cleaning it to produce a strong, secure link. Follow the manufacturer's directions meticulously when fastening the air duct, making sure a tight, leak-free seal.
With the air duct correctly connected, you can move on with incorporating it into your heater for ideal efficiency.
Protecting the Connection
With the duct positioned at the attachment site, you'll want to secure the connection to your heating system. Verify a limited, leak-free seal by very carefully adhering to the supplier's instructions for affixing the air duct. Apply air duct sealant or aluminum foil tape as needed to avoid any kind of air loss, which can lessen the system's effectiveness.
Next, consider the air duct insulation type. Inflexible or versatile insulation can assist preserve the temperature of the warmed air as it travels through the air duct. This is particularly essential if the duct runs through unheated rooms. Proper insulation will improve the system's performance and power effectiveness.
Now that the home heating duct remains in area, you can change your emphasis to the commode seat installation. Look for a top quality bathroom seat constructed from durable products like plastic or wood. Stay clear of less costly seats that may split or end up being unstable in time. Follow the manufacturer's instructions carefully to confirm a safe and secure, comfortable fit on your bathroom.
Making Sure an Appropriate Installation
To ensure a correct installment, you'll want to meticulously measure the toilet seat and air duct opening to ensure a snug, safe fit.
Follow the maker's guidelines carefully, and confirm all dimensions prior to continuing. Overlooking even the tiniest details can lead to typical blunders like ill-fitting bathroom seats or heating air ducts that don't align effectively.
Ensure the toilet seat's mounting openings line up flawlessly with the holes on the commode dish. If they do not, you may require to utilize an adapter plate or readjust the seat's position.
With the heating duct, make absolutely particular the opening matches the dimension of your ductwork - a limited seal is important to prevent air leaks.
Take your time and hold your horses during the installation procedure. Hurrying through can lead to sloppy job and aggravating concerns down the line.
Often Asked Questions
What Is the Best Way to Clean a Toilet Seat?
Cleaning your commode seat is a breeze!
Begin by inspecting the materials - whether it's plastic, wood, or some other kind.
Then, pick a cleaning solution that's secure for those materials.
Spray or wipe down the seat, and allow it sit for a couple of minutes to break down any kind of grime.
Ultimately, provide it an excellent scrub and rinse.
With the ideal technique, your toilet seat will shimmer in no time!
Can I Reuse the Old Bolts for the New Toilet Seat?
You can reuse the old bolts for your brand-new toilet seat installation, yet it's normally far better to replace them.
The old bolts may be used or damaged, making a safe fit difficult.
When replacing the bolts, make certain they're the ideal size and material for your commode.
Use stainless-steel or brass screws for a durable connection.
Take the time to properly set up the brand-new seat, and your commode will look and work terrific.
Just how Do I Avoid Water From Dripping Around the Commode?
To stop water from leaking around the toilet, make certain the toilet flange remains in excellent problem and effectively sealed.
Start by completely cleaning the area around the base.
Next off, set up a brand-new wax ring in between the commode and the flange, making certain it's centered and pressed securely into area.
Lastly, tighten up the bathroom bolts uniformly to develop a safe, watertight seal.
With these steps, you can avoid any kind of unwanted water problems.
Is It Safe to Install a Home Heating Air Duct Myself?
It's usually secure to set up a heating duct on your own, however you'll want to take some preventative measures.
Ensure you turn off the power prior to beginning and comply with the maker's guidelines meticulously.
Bear in mind any type of electric circuitry or pipes in the walls, and use correct security equipment like handwear covers and eye protection.
If you're uncomfortable with any kind of component of the do it yourself home heating duct installation, it's best to work with a professional to guarantee it's done securely and up to code.
How Do I Keep a Newly Mounted Heating Duct?
To preserve your recently installed home heating duct, concentrate on the duct insulation and air flow balance.
On a regular basis check for any gaps or tears in the insulation to avoid warm loss.
Likewise, make sure the air flow is well balanced throughout the air duct system by keeping an eye on air vents and adjusting them as needed.
This will help preserve peak performance and maintain your home comfy.
Bear in mind to address any kind of issues without delay to avoid issues down the line.
Final thought

As soon as you have actually gotten rid of the old commode seat and set up the brand-new one, take the following action and attend to the heating air duct.
Meticulously determine the opening, reduced the duct to size, and securely affix it to the heating system.
Bear in mind to use air duct tape or sealer to develop a tight seal, ensuring efficient air flow.
With these actions total, you've efficiently updated your bathroom and heating unit.
